Friday 21 February 2014

More Amore Scrapbook Pages

Hello everyone,

Tuesday's scrapbook class started a little nippy until I found the heating switch, then it warmed up as we welcome a few new members to our group. A lovely hello to Maureen, Kay (aka as Kim ;) and Charm!

Here are the pages we made along a love theme, with the wonder marriage of colours Costal Cabana, Real Red and Strawberry Slush!  Hopefully a few close ups of the pages will allow you to see the detail of them.


We used a lovely embellishment kit which was available in the clearance rack and the Boho Blossom punch to build the corner of flowers below. We also used the textured card stock and sanded it down to give it that vintage look!


 Here you can see our lovely banner using the beautiful and free Banner Blast Stamp set alongside the lovely Language of Love.


I hope you've liked this month's pages.I do have a couple of places left on my scrapbook class, so if you would like to join us please do get in touch (07821162950), it is on the 3rd Tuesday of the month. The next will be the 18th of March where we will be making a little scrapbook album.
Until next time, take care, 
D x


Table built using Stampin' Up! Product Table Builder from The Crafty Owl.


Sunday 9 February 2014

Card in a box tutorial! WARNING - Very Addictive!

Hello everyone,

I am writing this on Sunday, not sure if I will finish it tonight, fingers crossed, as my Monday & Tuesdays are usually pretty busy, so I thought I could at least start this today. We celebrated my dad's birthday today and this is who the card is for - I must warn you, these cards are so simple they are ADDICTIVE!


Excuse the photo, I'll take a better one in the light but let's get on to the tutorial. 
First cut your A4 card in half *the same size you would to make a C6 card - 10.5x14.8cm.

Then score at the 14.8 side at 2, 4, ,6, 8 inches. Then turn and score at 2 3/4 inches. 


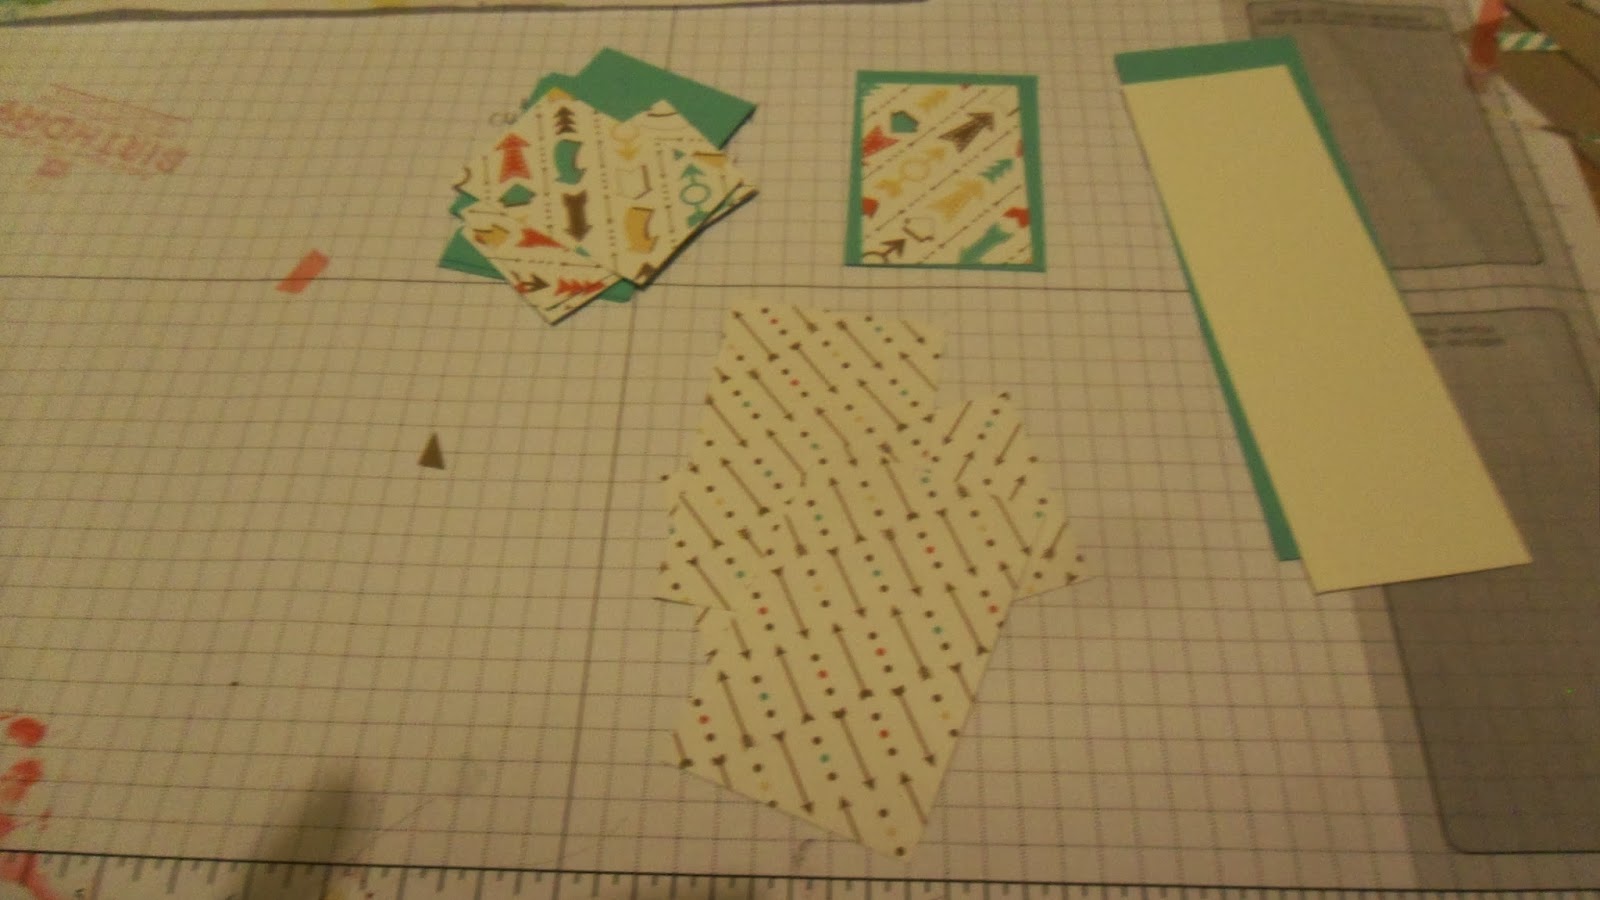
Then cut down the lengths of the 2  3/4 inches, as in the picture, also cut the extra small flap at the top (see mine highlighted).


Sorry just to confuse you all I flipped it, but this is what it should look like once cut and where I've written is the only side/flap you don't fold - so fold the rest of the sides.
Then put some double sided tape on the 'extra flap'.


Peel and stick to the other side creating a box!


Now we need to create little tabs to fit inside to create the platform to our card. 
Cut 2 pieces of card 3 inches by 1 inches, then score at 1/2 inch at both ends, then fold.


stick some double sided tape at either ends but at opposite directions, which is why you can only see one as the other side is on the opposite end.


Unpeel one end and this is how you will stick it in the middle of your box but as close to the top edge as possible!


Repeat with the other one and it should look like that!


Now it's time to decorate, if you are going to decorate the bottom 3 sides, you need to cut out 3 pieces of co-ordinating card 2 and 3/4 inch by 1 and 3/4 inc, then in a co-ordinating designer paper 2 and 1/2 inch by 1 and 1/2 inch.

For the top folding flaps, you can use the same as the bottom or if it is double sided, you can use the reverse to the bottom, so cut 4 pieces of card at 2 and 1/2 inches by 1 and 1/2 and 4 pieces of DSP at 2 and 1/4 by 1 and 1/4 inches.

You should have something similar to this: 


The two long strips are for the back, the sizes of these are, card 1 and 3/4 inch by 5 and 1/2 inches and then in Very Vanilla 1 and 1/2 inch and 4 and 1/4 inch. 

Then it's up to you how to decorate it, I hope this one will give you some ideas, anything that 'pops out' is stuck on the two platforms we stuck earlier!


I do hope you have found this tutorial useful, I would love to read any of your comments. 
Enjoy, I would love to see your card in a box too! 
Until next time, 
D x


Saturday 8 February 2014

SAL-A-BRATION Blog hop....pop by for ideas!

Hello everyone,

If you're come over from the lovely Anne-Marie, welcome! I'm setting my blog up ready for this blog hop, Friday night, so if you have popped by for the card in the box tutorial, I promise it will be in the next post!

This is the card we made at the last Card Class, we made our own stamped designer paper using the Petal Parade Stamp (FREE SAB) and also the See Ya Later Set (FREE SAB). As you all may have noticed Im loving the new Fancy Tag Punch, and it is just so versatile, not just for tags!


We heat embossed the powder on the stamps on the tag to give it a lovely texture and shine! As you can see from the following photo, we have three colours, Basic Gray, Summer Starfruit and Crisp Cantaloupe but I only use one embossing powder in clear! This technique is done using the wetness of the coloured ink to hold the powder just before heating!


I hope you've got some ideas from this card and if you would like to carry on with the blog hop, 
Vicky has something truly gorgeous in store for you here.
Here is a list of products used, our next card class is on the 4th of March!
Take care D x


Table built using Stampin' Up! Product Table Builder from The Crafty Owl.

Thursday 6 February 2014

Love is in the air, along with the wind and the rain!

Hi all,
It is pouring outside, so glad to be in the warm. Today I am going to share with you the two cards with made at our latest card class on Tuesday.


We made this gorgeous card in a box, it's folds back up to fit in a C6 envelope which would be great to post.  Here's a close up.


I have a used a new Stamp Set from the Spring Catalogue called Language of Love and the FREE SAB Banner Blast. 

Here is what we used, I will be back soon with the dimensions and instructions on how to make a card in a box, so do please pop back! If you would like to join us at our next Card Class on 4th March, please call me on 07821162950.

D x
Table built using Stampin' Up! Product Table Builder from The Crafty Owl.