Wednesday 1 October 2014

Sweet Scrapbooking!

Hello dear reader,
Today I thought I would share with you a couple of Scrapbook pages we did at our last Scrapbook club. We meet every 3rd Tuesday of the month, our next being the 21st October at 7.30-9.30pm at Chelmer Village Hall.

The theme was loosely flowers, and we used the gorgeous Flowerpot designer series paper and my favourite combo of colours Pistacchio Pudding, Crisp Cantaloupe, Calypso Coral and Pool Party - I just love the subtleness of these colours.


I will come back and list some of the stamps we used, which were mainly Flower shop and some Project Life ones for journaling.

If you would like to join us for scrapbooking, I have 2 places left.
Until next time,
D xx

Friday 26 September 2014

Sew it's Saturday...

Hello everyone,

I've been meaning to share with you this dress I made at the beginning of September. I bought the fabric after seeing finding a Ruby dress pattern in a magazine I get.


I loved the fabric but not sure you can make heads or tails of it in the pic, so here is a close of it!


It's from Plush Addict, love that shop! Drop by soon with some paper crafts next!

Until then, I hope you like this!
D xx

Wednesday 17 September 2014

A 30th Birthday Card to share with you!

Hi there dear reader,
Hope you are well...first week is always hectic, not only because of the start of the school term but also because it's both my husband's and daughter's birthday on the same day! Now that is over, I'm back to creating a few Christmas projects as well as some hand sewn ones!

Today I share with you a quick card I made for a friend's 30th!I I'm hoping it would fall under the Vintage theme!


I've used a mixture of crisp cantaloupe, crumb cake and soft suede. The stamp set is Everything Eleanor, with the pennant punch for the lovely pennants which I embossed!  I fussy cut the flowers to give it that extra 3D effect. I hope you like it and I hope you come back in a few days for my sewing project!
 
Thanks for reading,
Donna

Sunday 14 September 2014

Colouring in for grown ups...

Hello everyone,

Hope you're all well. I'm sharing with you a lovely card which I've made for my Thursday's Butterflies & Bloom class (which I still have 2 places left!) It used the new blender pens, which is just like colouring in! I do love this flower!

 
I have used the Coastal Cabana and Daffodil Delight blender pens and the gorgeous Blended Bloom Stamp which has been inked in the Momento Jet Black as this stops the pens from running.
 
If you would like to make this card and more...come to my Butterflies & Bloom Card Class this Thursday 18th September!
 
 
Thanks for dropping by,
D xx
 

Monday 1 September 2014

FREE Stamp Set...HOW?

Hi there,

Just a quick one today to let you know about the FREE Stamp Set you can earn if you host a Stampin Up party/workshop and your party total reaches £200, this is what you get...

A Fab Sentiment stamp called Good Greeting with 19 holiday sentiments!
 
 
I have used a couple already, my Christmas favourite is Merry & Bright!
 
 
I should be receiving my new camera soon, so hopefully I'll promise you better quality photos!
Thanks for reading,
D xx
 

Sunday 31 August 2014

Sew it Saturday...

Hello readers,

Sew it Saturday was actually a day out admiring someone else's makes.

Off we went to see The Fluffy Cornershop in Bethnal Green. It was busier than I thought but full of delight.

We came away with a Drifter, mainly as this was my chocolate treat as a teen, that my nan used to send to me when I was in Malta. I used love my nans letters and parcels, and I would always have eaten one on my way from the post office to town. So this is going to remind me of that!

Here are some photos, unfortunately today was the last day and I'm not quite sure what is going to happen to any (if she indeed had any) left!


I do have more photos that I will share with you over the next week. My sewing project at the moment is a Ruby dress in some fantastic Fox farbric! More to follow soon.
Thanks for dropping by.
D x

Thursday 28 August 2014

New Seasonal Catalogue - full of Christmas gorgeousness!

Hello dear reader,

Well how exciting, I bring the new catalogue full of exciting new stamps with matching framelits, paper and lots of more!

Here is the catalogue, if you click here, it should take you to a electronic copy of it. However, if you would like a hard copy to read at bedtime ;) then drop me a line and I can pop one in the post for you!

 
I love a lot of it and I have been making some lovely bits, particularly Christmas Cards. I'm going to share with you some that will probably feature in my Christmas Stamp-a-Stack. Dates for these are...
 
Thursday 2nd October 7.00 - 10.00
Thursday 6th November 7.00 - 10.00
 
and a special
Make your own Christmas
Thursday 4th December 7.00-10.00


If you would like to join us, please email me
to book your place. Spaces are limited.
 
I'll be back soon, oh don't forget the weekly deals here...
 
http://www2.stampinup.com/ECWeb/ItemList.aspx?categoryid=3068
 
Until next time,
D xx


Monday 25 August 2014

Christmas (dare I say it!) is round the corner!

Dear readers,

If you are still with me (after reading my title post!) I would just like to mention that it is just...

 
So I have been working  on a few Christmas cards for the last few weeks, to see which will feature in this year's Christmas Stamp-a-Stack!
Dates will be finalised and shared with you this week, so that you will be able to pencil them into your diary, get a baby /dog sitter, take evening off work, invite a friend...any of the above!
 
So I leave you with one of my favourites which will definitely be making it into the Stamp-a-Stack class!


Uhh, do you recognise anything new?
 
D ;-)

Saturday 23 August 2014

And Sew it's Saturday!

Hello once again,

(So far so good, 3rd post this week!!) 

As some of you may be aware if you follow my facebook page (if not and you would like to, just like my page https://www.facebook.com/headoverheelsbydlm ) I have started to sew a little too, a few dresses and a few presents too. Today I thought I'd share with you a present I made for one of Lily's little friends.


I had seen something similar online but I'm afraid I didn't use a pattern, but if you look for roll up pencil case you might find something to guide you.
 
Until next time,
D xx

Wednesday 20 August 2014

Weekly deals & Big Shot Savings + Special Offers in Framelits bundles!

Hi again,

Just quick one to give you a couple of special offers.


The weekly deals are fab! Click here to see them in more detail, but here is what's on offer this week!


Table built using Stampin' Up! Product Table Builder from The Crafty Owl.


Another offer that is running in August. Purchase a big shot and get a FREE Framlits & coordinating stamp set. Already got a big shot, you can purchase any of the bundles with 15% off!

Click here to see the poster bigger!


Also, don't forget the clearance rail and you can order anything you like and  get it delivered straight to your door...just pop along to my shop...
 
Until next time!
Donna x


Tuesday 19 August 2014

Sorry it's been a very long while...

Hello everyone,
 I must apologise it's been a while since I updated this and the main reason is that I have used facebook more as uploading from my phone is just so much quicker but I promise ( with myh little finger) that I am going to update my blog at least twice a week, a third would be a bonus!

Gosh...there is so much to share with you, I actually need to see what photos I have on my laptop. I must also point out that I have been dabbling in other crafts, such as sewing, knitting and crocheting. Ohh actually last night I did a bit of pottery painting!

But today I will show you a set of cards I have made which I'm calling Butterflies and Bloom!

You too can make these...details are on the poster if you would like to join me, message me or drop me an email @  head-over-heels-by-dlm@hotmail.com


I will be showing you these individually in the next few weeks. Thank you for reading and it's good to be back - bare with me while I updated my page!
Thanks
D xx

Saturday 19 April 2014

Hip Hip Hooray Card Kit

Hello everyone,

I wish you all a lovely Easter, filled with happiness and chocolate! I am going to remind you about the fantastic 'Hip Hip HOORAY' Card kit Stampin Up! have at the moment. You can make 20 cards with this kit and it includes a little stampin spot to get you going and 3 stamps! All this for just £17.95


Click here to see the flyer in full to see more examples of the cards you can create! If you would like to have a go at making these, you can buy them direct from my online shop or get in touch at head-over-heels-by-dlm@hotmail.com

Until next time, 
D xx

Wednesday 9 April 2014

Weekly Deals!! Money off Stampin' Up! Products - Oh yes please!!

Hi all,
Sorry it's been a while, no sooner to I feel like I have got myself in a routine I find something throws itself at me and sets me back a few weeks! Oh well, on wards and up wards!!


I come bearing exciting news...every Wednesday for the next 3 weeks, Stampin' Up! will be giving us a weekly deal! Click here  to see what is on offer and you'll be able to buy now RIGHT NOW from my online shop... here is a page using one of the things that is on offer!


This was a scrapbook page I did with the new WI Paper Girls...they loved creating it and I must say it was such fun!


I have been working on a number of projects, so I promise I will be back before next Wednesday's deal, in the meantime, pop by my shop to order your goodies!

Until next time, 
D x

Friday 21 February 2014

More Amore Scrapbook Pages

Hello everyone,

Tuesday's scrapbook class started a little nippy until I found the heating switch, then it warmed up as we welcome a few new members to our group. A lovely hello to Maureen, Kay (aka as Kim ;) and Charm!

Here are the pages we made along a love theme, with the wonder marriage of colours Costal Cabana, Real Red and Strawberry Slush!  Hopefully a few close ups of the pages will allow you to see the detail of them.


We used a lovely embellishment kit which was available in the clearance rack and the Boho Blossom punch to build the corner of flowers below. We also used the textured card stock and sanded it down to give it that vintage look!


 Here you can see our lovely banner using the beautiful and free Banner Blast Stamp set alongside the lovely Language of Love.


I hope you've liked this month's pages.I do have a couple of places left on my scrapbook class, so if you would like to join us please do get in touch (07821162950), it is on the 3rd Tuesday of the month. The next will be the 18th of March where we will be making a little scrapbook album.
Until next time, take care, 
D x


Table built using Stampin' Up! Product Table Builder from The Crafty Owl.


Sunday 9 February 2014

Card in a box tutorial! WARNING - Very Addictive!

Hello everyone,

I am writing this on Sunday, not sure if I will finish it tonight, fingers crossed, as my Monday & Tuesdays are usually pretty busy, so I thought I could at least start this today. We celebrated my dad's birthday today and this is who the card is for - I must warn you, these cards are so simple they are ADDICTIVE!


Excuse the photo, I'll take a better one in the light but let's get on to the tutorial. 
First cut your A4 card in half *the same size you would to make a C6 card - 10.5x14.8cm.

Then score at the 14.8 side at 2, 4, ,6, 8 inches. Then turn and score at 2 3/4 inches. 


Then cut down the lengths of the 2  3/4 inches, as in the picture, also cut the extra small flap at the top (see mine highlighted).


Sorry just to confuse you all I flipped it, but this is what it should look like once cut and where I've written is the only side/flap you don't fold - so fold the rest of the sides.
Then put some double sided tape on the 'extra flap'.


Peel and stick to the other side creating a box!


Now we need to create little tabs to fit inside to create the platform to our card. 
Cut 2 pieces of card 3 inches by 1 inches, then score at 1/2 inch at both ends, then fold.


stick some double sided tape at either ends but at opposite directions, which is why you can only see one as the other side is on the opposite end.


Unpeel one end and this is how you will stick it in the middle of your box but as close to the top edge as possible!


Repeat with the other one and it should look like that!


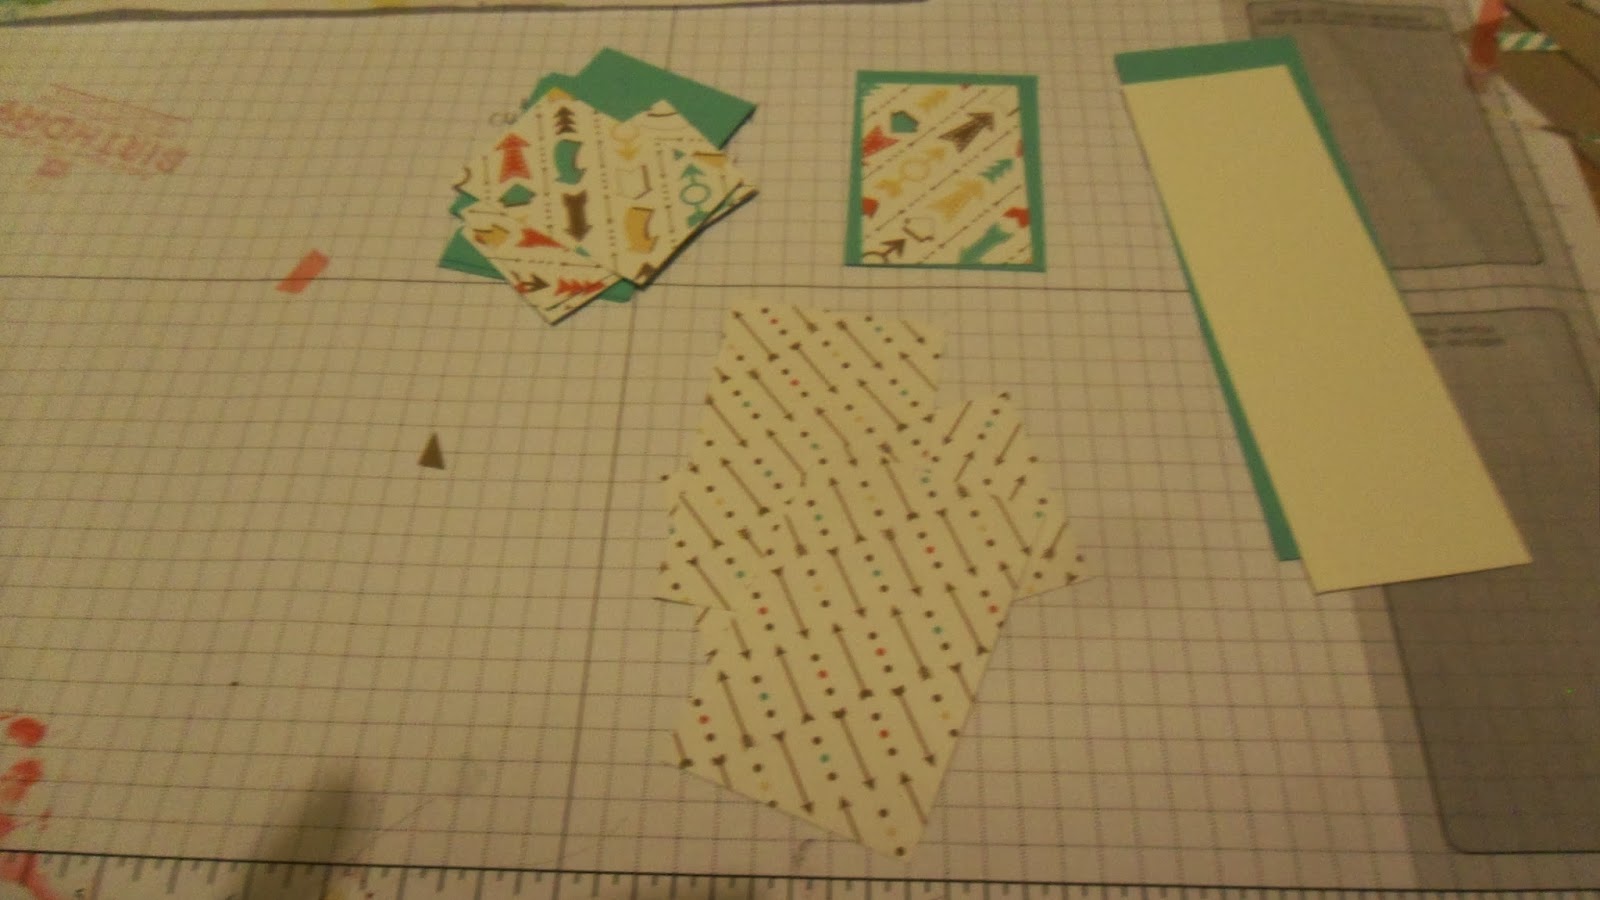
Now it's time to decorate, if you are going to decorate the bottom 3 sides, you need to cut out 3 pieces of co-ordinating card 2 and 3/4 inch by 1 and 3/4 inc, then in a co-ordinating designer paper 2 and 1/2 inch by 1 and 1/2 inch.

For the top folding flaps, you can use the same as the bottom or if it is double sided, you can use the reverse to the bottom, so cut 4 pieces of card at 2 and 1/2 inches by 1 and 1/2 and 4 pieces of DSP at 2 and 1/4 by 1 and 1/4 inches.

You should have something similar to this: 


The two long strips are for the back, the sizes of these are, card 1 and 3/4 inch by 5 and 1/2 inches and then in Very Vanilla 1 and 1/2 inch and 4 and 1/4 inch. 

Then it's up to you how to decorate it, I hope this one will give you some ideas, anything that 'pops out' is stuck on the two platforms we stuck earlier!


I do hope you have found this tutorial useful, I would love to read any of your comments. 
Enjoy, I would love to see your card in a box too! 
Until next time, 
D x