Sunday, 30 January 2011

A busy weekend...

Hi all, I must admit that I haven't been stampin' this weekend, instead I have been baking!
I had two parties yesterday, and so as well as cards (that I lucky had made during the week) I gave them some lovely cupcakes and a big 18th birthday cake. Here it is:
If I had to say what colour, it would probably be Melon Mamba with all sorts of 'Brights' sweets. It tasted very sweet too! Anyway, I am working on my swaps for Sundays' training, got to make 50, so I'm trying to keep it simple...watch this space for maybe a sneak preview! 
Until next time, Happy Stampin'!
Donna x

Tuesday, 25 January 2011

Another Mojo Monday...

Maybe I ought to call it 'Task for Tuesday' as I always seem to find the time to do it on a Tuesday for some reason and not so much a Monday. Hey ho...Here it is, I had this idea when I saw the sketch and I had seen something similar done online (not sure where, but thank you!). This is going to a couple who will be celebrating something very special this weekend. So it had a real purpose.  

I used brown card and ribbon I already had. I used Melon Mamba ink to sponge the pink petals and for the middle. I also used Old Olive DSP and the same in pink to contrast. The Scallop edge to give the Old Olive a different finish. Oh and I used the Ornament Punch for the petals...did anyone guess that, I was amazed when I first saw this done! Again, another very versatile punch from SU. Hope you like it!

Sunday, 23 January 2011

Blog Hop... with Sweet Summer (FREE Sale-a-bration stamp)

Hello again, and boy do I love the Sweet Summer Free Sale-a-bration stamp, it's so versatile, so much so I will be uploading more over the next few days. But here is my latest:

Here are the steps to make this card. I used Old Olive card, the pink DSP card and Whisper White card and Ribbon. The ink pads used were Old Olive and Melon Mamba with of course the SAB Sweet Summer Stamp Set. 

The card was cut horizontally, so you end up with a long strip, then the pink DSP was cut to size but not mounted as the Whisper White ribbon needs to be attached first.

Punch out 3 Extra large Scallops out of the Old Olive card and 3 out of the Whisper White.
You will be stamping 2 flowers on the white to mount on the Old Olive and stamping 1 on the Old Olive to mount on the Whisper White.

As you can see I used the Versamark for the leave on the Old Olive card, this gives a nice sheen stamp. I stamped a couple of bees, which I then coloured in using Daffodil yellow marker pen. 

Mount them so that the scallop edge is over lapping each other at opposite angles (hope that makes sense). 

The Whisper White Ribbon was then stuck in the middle of the Pink DSP. Ready for the 3 circles to be stuck. Actually only 2 fitted, so I did away with the green one!


A small saying was stamped (this is actually retired, it was the only one I had, but anyone will do, as you can add the butterfly from the Sweet Summer to tie in with the flowers!)

Viola' your Sweet Summer card is ready, if only it was sunny outside, as now I'm longing for Summer! Hope you enjoyed it, any comments welcome! Thank you D x


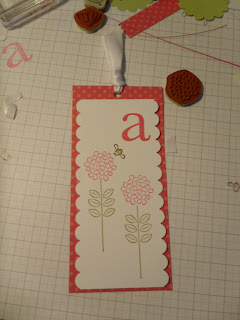
Here is a little bookmark I made using the Sweet Summer, just an extra idea. Email me for instructions :)


To see more Sale-A-Bration Stamp Set ideas and continue your stamping jouney, go to:
You can see loads of wonderful ideas by going on these blog hops, if you would like to here is where to start, there are 4 groups, all you have to do is go to the first...enjoy!

Group 1, start at super SaraStamper
Group 2, start at tastic Theresa
Group 3, start at kreative KarenJB
And Group 4, it's kool Kirsteen


Saturday, 22 January 2011

My First party...

Hi all, I had my first party on Thursday...wasn't sure how it was going to go, but it went really well. The smile I had whilst creating all these delights I could see on my fellow friends. At first they all thought they wouldn't be creative enough and would all just copy mine but they all ended up with different concepts of the same design. All of which I was very proud of. 

 Preparing the room, so everything is ready laid out.


Table of delights, a few bits I made earlier, the beautiful Designer Paper Series Samples from Caroline and some other bits Helen had given me and a few swaps from another lovely Stamper, Elaine.

The laughter and fun that went on was all so wonderful and they all left so high that they had relaxed and felt so proud to have produced such a lovely Valentine's Card. here are a few pictures of the evening.


By the way, the idea from Donna, glb, stands for girl loves boy, very sweet I thought. 

Sunday, 16 January 2011

A new design...

Hi again, another post sooner than I thought! I had just asked my upline Caroline if I could borrow a couple of her things, the round scallop punch being one of them as it is currently out of stock. As always, Caroline has said of course...and so I got baking and then thinking...I could give Caroline a muffin as a thank you..but I need a box. So here is my first attempt as designing and making a muffin treat box to fit my cases lol

 Slightly amateur, but I will fine tune it over the next few days and upload a tutorial. Feedback always welcome! Ink used was chocolate chip and the yellow card and brown ribbon was my own. 

Preparing for my first party!

Hi all, just a sneak preview at some of the things I'm preparing to display at my first party this week.
I used an idea I came across on the internet, so thank you to whoever that was. I altered it slightly by adding the love heart on the ribbon. I used the i (heart) hearts stamp for the heart and the wings, I just stamped extra hearts and punched the wings out of them, again I'm using my favourite punch - the extra large bird. I also used the whisper white card and ribbon and the Olive Green Stampin' Ink. Hopefully there will be more to follow!

Thursday, 13 January 2011

Little Treats!

Hi all I am working on my first workshop/party which will be next week so I am giving out the invites tomorrow. Some suggest giving them out two weeks prior, but due to a date where most of my friends could make it, one weeks notice is enough.
Anyway, the them is 'Love is in the air' and I have made these cute little bookmarks to give away with the invites as a taster of what they can make at the party.


I used the Pink Designer Paper for the background, from the Getting Started range, and the stamps came from the 'Love You So Much' - I stamped the birds' in Chocolate Chip ink and the heart in Melon Mamba. The small love heart came from the I (heart) Hearts stamp set. These are the stamps that we will be using.
The little treat box in the background is something I am going to give them, it's filled with Bath Confetti and smells gorgeous! Instructions for that are to follow! 

Tuesday, 11 January 2011

My First Mojo Monday Challenge!

This is this week's Mojo Monday Challenge. I used the I (Hearts) Hearts stamp set as well as Love You Much . I'm not sure why I chose these colours, but thought they would work well. The card was my own and the ink is Stampin' Up! Basic Black. Here are the steps of what I did.

I used the dotted heart from the I (Heart) Heart to do some background hearts with the Basic Black ink. What I also found very useful, since my starter kit arrived was the Stampin' Scrub, to clean the stamps. It has one side where you spray it with Stampin' Mist (a cleaning liquid) and rub the stamp, then you can dry it on the other side, which is dry. Have a look!
 This is how the stamp with Black in on it.
 This is the side to scrub it on, with the mist already on.
This is the side where you wipe it dry, so to speak!

Back to the card now!

Then I stuck the pink backing in the centre of the card and stamped the Love you much stamp on pink and mounted it on black. I carefully cut round the flower, I'm starting to like this effect, as it makes the main stamp stick out a little!

Then I used some black ribbon to stick the tiny hearts and friend hearts on, I had a small heart punch but I hand cut the bigger friend heart.


Then finally I stuck the two small hearts and voila'....


Let me know what you think, any feedback welcome...leave a comment!
I will most probably give this to my best friend in Malta for Valentine's Day...I'm sure she will love it!

Sunday, 9 January 2011

Thinking of you!

Hello all,
I have got another card to upload. Unfortunately this was a sympathy card to my aunt, who sadly lost her daughter between Christmas and New Year.

I used the Botanical Blooms set (which is retired - ie no longer in catalogue). However, you can use the Greenhouse Garden on p51 of the current catalogue. You need a stamp set where you can create 'two-step stampin'. This is where you stamp the image with one colour, and then you could either re-stamp it with a lighter colour or sometimes the stamp set comes with a similar picture but it might be just the outline. This is what I did above, I stamped the outline in old olive, then again with the full stamp. Hope this makes sense. The card and 'thinking of you' stamp were my own.

Tuesday, 4 January 2011

Baby Blues!

Here is my first ever baby card. This is for a colleague who recently had a baby boy.


Luckily and very kindly I borrowed the following from my SU (Stampin' Up!) Mom Caroline as mine are in the post! These were the 'Bundle of Love 121223 (wood mounted - £26.95) 121291  (clear £21.95)  for 16 stamps. I also used the jumbo Stampin' Around wheel with Baby Tees (118621 - £8.50). The card was my own stock and I used Marina Mist Stampin' Up! Ink Pad. Here are the steps of how I made this:


I first used the Jumbo Stampin' Around wheel with the Baby Tees to do the background, the ink used was Marina Mist. I trimmed this card so that it fitted in the A5 cream card with about 1cm border (Hope that makes sense!).


I printed the pram and cut round the edge for an extra effect and mounted. I then wondered how I was going to put this on the front of the card and thought of hanging it from the top. So I put two holes exactly in the centre of the navy paper, one at the top and one at the bottom. I also printed a little caption and hole punched this in the centre as shown in the picture below.


The ribbon was then attached to the pale blue background using the snail adhesive, which is a double sided sticky tape. 
And here is the final product, let me know what you thought, I am sure the mum is going to love this!


Monday, 3 January 2011

Happy New Year everyone!

Hi to all in 2011.
Before I wipe the slate clean, so to speak, I just wanted to upload the last few pictures of some Christmas treat boxes I made for some colleagues at work.


These were also filled with a few Christmas Shortbread biscuits. The person who got me into Stampin' Up! Helen (see her blog on my list!) kindly gave me the 'pattern'. If you would like the instructions - it requires a drawing to be somehow translated into word - I will try! Email me at head-over-heels-by-dlm@hotmail.com and I will send it to you!