Take a look at the Card Classes Page.
Monday, 28 February 2011
Sunday, 27 February 2011
A final farewell to the beautiful SAB Sets
Hi all, for those of you who ordered more than £45 worth of Stampin' Up! products, you would have got one of the following sets FREE - Sweet Summer, Punch Bunch, So Happy For you and Bliss. I have been using all these sets loads and here are some of my latest cards. I have a couple of birthdays, one is slightly belated and the other is for a male cousin of mine. I always find it hard to make cards for men, but I am absolutely loving the Owl in the Punch Bunch set and watch this space, as SU should be bringing out the punch to match real soon!
Hope you like these, I'd appreciate your thoughts so please leave a message.
D x
Saturday, 26 February 2011
Sneak Preview of Mother's Day Card Class
I am delighted that I have confirmed a venue for my monthly Card Classes. The initial one is on the 22nd of March and then on the first Tuesday of every month. Go to 'Card Classes' page for more information.
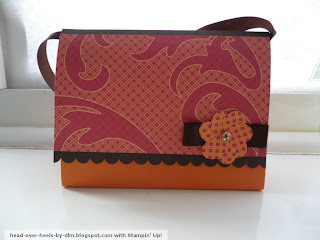
We will be making a Mother's Day card, a gift box (suitable for some beautiful jewellery) and hoping we will still have some time for a book mark. The photo below is similar to what we will be making...
We will be making a Mother's Day card, a gift box (suitable for some beautiful jewellery) and hoping we will still have some time for a book mark. The photo below is similar to what we will be making...
I am working on some other cards using the Bliss SAB set, which you can only get until Monday 28th February, so hurry up! I will upload these later or tomorrow.
Enjoy the rest of your Saturday,
D x
Tuesday, 22 February 2011
Pretty Accordion Purse
Hi all, Hope you are all well, and if you are a teacher you will be enjoying half term and if you are a mum, you're enjoying time with your children. The weather is not that great, perfect for crafting though.
So here is Pretty Accordion Purse, we were very kindly given the instructions by the very talented Monica at the training I attended a few week back. I love the Sweet & Sour DSP, this would be ideal to hold some little note cards.
So here is Pretty Accordion Purse, we were very kindly given the instructions by the very talented Monica at the training I attended a few week back. I love the Sweet & Sour DSP, this would be ideal to hold some little note cards.
If you would like to order some Stampin' Up! goodies, or some special DSP paper like I used in this project. Hurry, because if you spend £45 or more, you can get a FREE stamp set. Must order before 27th February 2011. Look forward to hearing from you.
Until next time (tomorrow I hope)
D x
Wednesday, 16 February 2011
Punch Pot Pourri!
This is becoming one of my favourite sets and I am so lucky to have hosted my own party, and reached the level 1 hostess benefits to get it!
I used chocolate chip ink and card. Early Espresso ribbon and with a Daffodil Delight marker, I stamped the butterfly and flower. The bird has also been punched out using the Extra large Bird punch, stuck with a dimensional to give the 'jotting out' effect. Not sure if you can see the full effect, but I stuck a rhinestone in the middle of the small flower for a little sparkle.
Hope you like this and thanks for visiting,
D x
Saturday, 12 February 2011
Got creatively carried away!
Hello all and happy Saturday, I have spent a rather relaxing afternoon crafting away. I've made a few tags to go with gifts for an upcoming dinner party. I cannot believe how lovely they turned out. Here are some photos. The card used was Razzleberry, I used the versamark to stamp on the baroque style stamp, from Wedding Sweet . For the front, I stamped the For You Stamp, using the Old Olive Ink Pad. This stamp is part of the Punch Bunch Set, which you can get for FREE if you spend £45 from the catalogue. Email me for details. I have limited punches, so I had to cut out the For You free hand, but the Scallop Punch (on my wish list) is designed for this stamp. The Thank you, in the card is from the Wedding Sweet Stamp Set.
Here is a close up of the Wine Tag and Thank You card.
This little Thank You card, fits in the Wine Tag.
Then I added this gorgeous tag to the flowers, using the Pot Pourri Stamp Set and I added a rhinestone for little sparkle. Ink Colour used here were Chocolate Chip and Daffodil Delight. If you would like to get your hands on the Pot Pourri Punch Set, all you need to do is book a workshop with me and if your total workshop exceeds £150, as the Hostess you can choose this stamp set from the Level 1 Hostess Benefits, on page 10, as well as having £15 to spend from the catalogue.
Thanks for Visiting.
D x
Friday, 11 February 2011
Paper clip swap Tutorial
Hello again, I have been a little poorly over the last couple of days, and although it's been on my mind to upload my swaps, I just couldn't face it! Anyway, enough of me...here is how I made the paper clip swaps for Peterborough's training day. I had to make 50 of them so good job the paper clips were cheap (off ebay) and very quick to make.
These are all 50, here is a close up of one.
The colours I used were Melon Mamba, Old Olive and Marina Mist. I used this in ink, card and DSP.
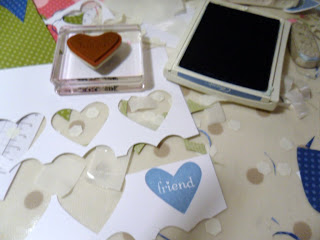
First, using the i (heart) hearts, friend stamp, stamp on whisper white card. Then punch it, using the extra large heart.
Then place on the Design Series Paper (DSP) and cut round leaving about a 3mm border.
No easy way of doing this, just sharp scissors and a steady hand!
Then to attach the two hearts, use the glue dots and put one on each side, because I was doing so many, I actually cut the glue dots in half. Then add the dimensionals to each side, as in picture.
Stick to larger DSP heart and if you wanted to put a background to it, just stamp the same coloured paper using the same colour ink, as you will find all Stampin' Up! products, such as card, ink, ribbon, DSP to name just a few on the list come in the same colour combination. In this case, Melon Mamba, Marina Mist and Old Olive.
The background size was 7.5cm wide and 10cm high. I stamped the background paper using the three hearts in love you much. Then to have slips to put the paper clip through, I just used a Stanley knife over my score board like so.
Slip the paper clip in gently, and there you have a tailored made paper clip for all your stationary needs!
I would also like to add a short slide show with some photos of the day and I must say a huge THANK YOU to my SU Mom, Caroline, for driving and all the other fantastic people who swapped with me, they are all truly unique!
 |
| This slideshow customized with Smilebox |
For more chip board techniques see Caroline
For more wonderful ideas, see Anne
And for moving card ideas see Becki
Saturday, 5 February 2011
Loving Sweet Summer...
After a very busy week, both at work and at home (having new bathroom fitted!) here is a card i made rather quickly during the week.
I know the pic is a little blurred, so will try and make another soon and upload it with some steps. Tomorrow I am off to my first SU training day and boy am I looking forward to it. I have just finished 51 swaps, so I'll be coming back with a wealth of ideas...I will be uploading a tutorial for my swaps, which will be revealed tomorrow!See you tomorrow
and
thanks for visiting
D x
Labels:
sweet summer
Subscribe to:
Comments (Atom)


